Our Deployment Server (Windows Server 2008 R2) was getting a bit dated and I wanted to enjoy all the new WDS-features of Windows Server 2012 R2 (better UEFI support and enhanced boot image download performance for example). In this migration case I’ll be using physical servers so the migration will be physical-to-physical. The servers are old but they have enough power for the job 🙂
Old server (Fig 1):
- Fujitsu Siemens Primergy RX300 S2
- 2 x Intel Xeon 3.20GHz CPUs
- 4GB RAM
- 6 x 146GB SCSI HDDs in HW RAID-5
Fig 1. Fujitsu Siemens Primergy RX300 S2 (currently running Windows Server 2008 R2).
For the replacement/migration I originally had an identical server which ran Windows Server 2008 R2. It got upgraded to Windows Server 2012 some time ago however. I now tried upgrading it to Windows Server 2012 R2, but it just failed to start properly after the setup process was completed (error message and endless reboots). This was (probably) due to the same problem as before, as there are no drivers for the LSI MegaRAID 320-2E card. It was possible to trick the Windows Server 2008 R2 installation to use the Windows Server 2003 drivers (newest ones available), but this wasn’t the case with a clean install of Windows Server 2012 (R2). However, an upgrade from 2008 to 2012 was/is possible. As a server 2012 to server 2012 R2 upgrade wasn’t possible due to errors, I thought I’d try with the old method. That said, I clean-installed Server 2008 R2, and tried a Server 2012 R2 upgrade instead of the Server 2012 upgrade. This upgrade path wasn’t “allowed” by MS however, so I HAD to do a clean install. Well, I ran into the exact same problems as with the Server 2012 to Server 2012 R2 upgrade. The server won’t start properly, due to a very old and unsupported LSI MegaRAID card. Anyways, it was time to move on as I won’t waste any more time on these old bastards (Fujitsus).
This was not the end of the world though, I just used an old workstation instead of a server. It doesn’t have to be a hard-core server anyhow, because we usually don’t have many simultaneous deployments. It’s basically enough having a normal workstation with decent capacity hard drives in a raid configuration for safety (raid-1 or 5). Normally this sort of thing would be a good candidate for a virtual machine also, but our hosts are a bit full at the moment so it would’ve been even slower 🙂 With that said, here’s the “new server” (Fig 2):
- Osborne (in an Antec Sonata III case) with Asus PQ5-EM motherboard
- Intel Core 2 Duo 3.16GHz CPU
- 4GB RAM
- 2 x 250GB HDDs in HW RAID-1
Fig 2. “Osborne”
I installed the new “server” from scratch and copied over the needed content from the old server as the progress continued. Steps:
-
Installed Windows Server 2012 R2 from DVD
-
Ran Windows Update to get it fully patched
-
Installed Classic Shell (yes, I still don’t like Metro)
-
Installed Notepad++ for easier editing of configuration files
-
Installed Intel Rapid Storage Technology from Intel.com to monitor raid health (Fig 3). Also configured email alerts.
Fig 3. Intel RST
-
Partitioned/Resized the hard drive: 60GB for the system drive and the rest for data (Deployment Share)
-
Downloaded and installed ADK 8.1 for Windows 8.1 Update
-
Downloaded and installed MDT 2013
-
Enabled WDS Server Role
-
Set a static IP
-
Joined the production domain
-
Copied the whole Deployment Share directory (about 60GB) from the old server to this new one, (D:\DeploymentShare)
-
Shared the new Deployment Share directory via file sharing
-
Started MDT 2013 and chose to Open Deployment Share. Pointed it to the newly copied directory, D:\DeploymentShare (Fig 4)
Fig 4. Open Deployment Share
-
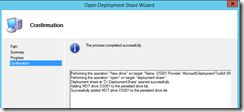
Successful import! (Fig 5)
Fig 5. Open Deployment Share – success.
-
Went to properties on the Deployment Share and changed UNC path to point to the new server (Fig 6)
Fig 6. Set Network (UNC) path
-
Edited D:\DeploymentShare\Control\Bootstrap.ini and changed DeployRoot to point to the new server (Fig 7)
Fig 7. DeployRoot in Bootstrap.ini
-
Updated the Deployment Share. MDT-part now done.
-
Started WDS and configured it (kind of self-explanatory so won’t add any steps or screenshots)
-
Added the newly created boot image from MDT (D:\DeploymentShare\Boot\LiteTouchPE_x86.wim) to WDS Boot Images
-
Changed the TFTP Maximum Block size for better boot image download performance (Fig 8). This is a new feature in WDS on Windows Server 2012 (R2). More information: http://technet.microsoft.com/en-us/magazine/dn163597.aspx. Yeah, it’s actually noticeably faster.
Fig 8. TFTP Maximum Block Size
-
Updated the DHCP configuration on our Linux DHPC server to point to the new server
-
Ran a test-deployment – Everything worked as before, except now I’m using a newer version of WDS with better UEFI support 🙂
-
Success yet again!
Source: http://lacietech.blogspot.fi/2010/10/migrating-mdt-2010-from-one-server-to.html
As usual, if you are interested in the whole deployment process/configuration, read my earlier post: Deploying Windows 7/8 with Microsoft Deployment Toolkit (MDT) 2012 Update 1 and Windows Deployment Services (WDS)


