I recently deployed Office 2013 SP1 (and wrote a blog post about it). Now I got the honours to do the same for Office 2016. The procedure is theoretically quite the same, but with many different bugs and gotchas. The following procedure describes how to remove any previous versions of Office and corresponding Proofing tools & language packs and replace them with Office 2016 versions. I’ll dive right into the steps:
Customizing Office 2016
- Got a copy of Office 2016 and extracted the iso. Our version is “Professional Plus” with Volume Licensing.
- Fired up a command prompt and navigated to the extracted Office directory.
- From here I ran “setup.exe /admin” to launch the Office Customization Tool (OCT).
- Customized the OCT settings according to our needs:
- Setup/Organization Name
- Setup/Licensing and user interface/Use KMS client key
- Setup/Licensing and user interface/I accept the terms in the License Agreement, Display level: None, No tick in Competition notice, Tick for Suppress modal and No cancel.
- Setup/Remove previous installations/Remove the following earlier versions of Microsoft Office Programs/Remove all (here’s a BUG btw, more on that later on).
- Setup/Modify Setup Properties:
- SETUP_REBOOT, value Never
- Features/Modify user settings:
- used a guide from http://stealthpuppy.com/office-2013-customization/ (works very nicely with 2016 also)
- Features/Set feature installation states:
- Everything gets installed.
- Additional content/Configure shortcuts
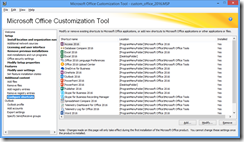
- For some weird reason, Office 2016 by default decides to put all of the shortcuts on the start menu WITHOUT a subdirectory – splattered all over the start menu. This is fixable by editing the shortcut entries. In Fig 2. below, I’ve added the path/directory \Microsoft Office 2016. You also have to add a “[“ in Start in, otherwise you can’t close the dialog box. It’s a “feature” (bug), see: https://support.microsoft.com/en-us/kb/2797938. While editing, you can also decide which shortcuts you want to put on the Desktop. In Fig 2, I’ve chosen to put the Excel shortcut on both the Desktop ([DesktopFolder]) and in the Start menu ([ProgramMenuFolder]\Microsoft Office 2016).
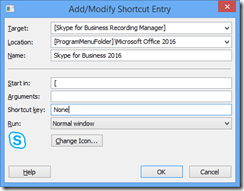
- Update: More bugs, sigh. Skype for Business shortcut launches “Skype for Business Recording Manager” instead of “Skype for Business”. I’m getting very frustrated with all the bugs. See: https://community.office365.com/en-us/f/166/t/344410. Anyways, I corrected the mistake MS has made. In Fig 3 target should definitely not be Skype for Business Recording Manger, instead it should be “Skype for Business 2016”. At least so I thought. After this “fix” (and a test-deployment), my reward was the following message:
Fig 1. Problem with shortcut
- Only solution (as I can see it), is to force-copy a “functional shortcut icon” during deployment. With functional I mean a shortcut that has been manually created from C:\Program Files (x86)\Microsoft Office\Office16\lync.exe. (You should also remove all the Skype for Business shortcut entries in OCT).
- This shortcut will then be deployed as a dependency. See later chapter about dependencies.
Fig 2. Office 2016 OCT.
Fig 3. Skype for Business – example shortcut entry.
Deploying Office 2016/Removing Office 2013/2010
The deployment part was quite straight forward after the customization part was done. Well, so I thought. Instead I got to fiddle with SCCM’s supersedence and dependencies. More on that later on. As with Office 2013, I basically followed a (very good) guide from http://www.ronnipedersen.com/2012/11/how-to-deploying-microsoft-office-2013-using-configmgr-2012/ with some changes for our environment. In this case the changes were about uninstalling Office 2013 SP1, as a fully patched Office 2013 SP1 WON’T get uninstalled even though I’ve chosen to remove previous versions in the OCT (see my (unanswered) post at https://social.technet.microsoft.com/Forums/office/en-US/a664a0c7-c6b5-40a3-9e04-f347556d39a0/office-2016-oct-bug-office-2013-doesnt-get-uninstalledremoved?forum=Office2016setupdeploy). The remove previous version-feature works with Office 2010 however, which means I don’t have to create a supersedence relation for that version (luckily).
Checking parameters for Office 2013 uninstallation:
In order for Office 2013 SP1 to be silently removed via SCCM before you install Office 2016, you have to be sure that the uninstall string is correct and a custom xml-file is in place. I’m already using “custom.xml” (together with OCT) for the installation part, so I’ve created a custom2.xml for the uninstallation part. (The reason for this is also a bug, see my Office 2013 deployment post). This file contains only the following information:
<Configuration Product=”ProPlus”>
<Display Level=”none” CompletionNotice=”no” SuppressModal=”yes” AcceptEula=”yes” />
</Configuration>
You’ll then use this xml file when you specify the uninstall string for Office 2013 SP1 in SCCM. See https://weikingteh.wordpress.com/2013/09/12/uninstallremove-office-2013-with-configmgr-2012/ for details. If you don’t specify a xml file, the uninstallation won’t be silent. This in turn means it won’t be successful.
Supersedence
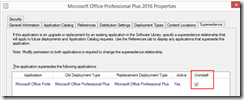
With all the parameters done, you can now deploy Office 2016 using Office 2013 as Supersedence (see screenshot below):
Fig 4. Supersedence.
All of the fields aren’t visible in the screenshot, but the fields are:
This application supersedes the following applications:
Application: Microsoft Office 2013 SP1
Old Deployment Type: Microsoft Office Professional Plus 2013 SP1 installer
Replacement Deployment Type: Microsoft Office Professional Plus 2016 installer
Active: Yes
Uninstall: Yes (Tick in the box)
That’s it! All the other options are the same as with a regular deployment, you just add the Supersedence-information (so Office 2013 SP1 can be successfully removed while installing Office 2016). This would not be successful without having specified the correct uninstallation information/parameters for Office 2013 SP1.
A general rule of thumb when using supersedence is that you must have the correct uninstall information specified for the application that will be superseded!
Update! I had problems deploying Office as “available”. (“Required” was working ok though). I always got the message “Past due – will be updated” in Software Center (see Fig 5). This on the other hand made Office upgrade itself without user interaction, which was not acceptable for a deployment that was made available (NOT required).
Fig 5. Past due – will be updated.
After some googling I found out it was related to the supersedence settings. Don’t know if you can call this a bug, but at least it was working better if I followed this advice:
“Regarding the issue where you have set the application to AVAILABLE in the deployment, however the application uninstalls and upgrades without user interaction, I have found a work around.
The cause of the problem seems to be when you are deploying an application to a collection the option “automatically upgrade any superseded versions of this application” is CHECKED and GREYED out. If you deploy the application BEFORE you have added the supersedence, this will NOT be greyed out and you will be able to leave it unchecked. Then add the supersedence rules.
Hope this helps
Kevin”
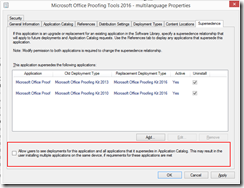
I mentioned the word better because even now it wasn’t working 100% correct. I had to click “Install” in Software Center about 3-4 times (for all the dependent applications). This wasn’t acceptable, as the software (and all its dependencies) should install with just ONE click. Well, I found the solution to this dilemma myself – just leave one checkbox unticked. (See Fig 6).
Fig 6. Supersedence checkbox.
With all this done, the deployment was running smoothly with just one click (“Install”) in Software Center.
Customizing Office Proofing Tools Kit 2016
This is actually the exact same procedure as for Proofing Tools 2013. I’ll copy/paste the information from my previous blog post:
We are using a Proofing Tools “CD” which include all of the proofing tool languages. Proofing Tools doesn’t/can’t change the UI language btw, only check the spelling. With this CD, there’s no need to separately download each proofing tool language. After some googling I stumbled upon http://www.msfn.org/board/topic/149212-office-2010-proofing-toolkit-silent-installation/ which seemed useful. Once again I’ll share my configuration so you don’t have to scratch your own head. First off, there’s NO “setup.exe /admin” on this cd/iso. You have to manually specify the languages (proofing) you need. The file you need to edit is located on the extracted iso, in my case \Office_2016_Proofing_Tools\proofkit.ww\config.xml. My file looks like this:
<Configuration Product=”Proofkit”>
<Display Level=”none” CompletionNotice=”no” SuppressModal=”yes” AcceptEula=”yes” />
<COMPANYNAME Value=”Abo Akademi” />
<OptionState Id=”ProofingTools_1053″ State=”local” Children=”force” />
<OptionState Id=”ProofingTools_1030″ State=”local” Children=”force” />
<OptionState Id=”ProofingTools_1035″ State=”local” Children=”force” />
<OptionState Id=”ProofingTools_1036″ State=”local” Children=”force” />
<OptionState Id=”ProofingTools_1031″ State=”local” Children=”force” />
<OptionState Id=”ProofingTools_1032″ State=”local” Children=”force” />
<OptionState Id=”ProofingTools_1040″ State=”local” Children=”force” />
<OptionState Id=”ProofingTools_1044″ State=”local” Children=”force” />
<OptionState Id=”ProofingTools_2068″ State=”local” Children=”force” />
<OptionState Id=”ProofingTools_1045″ State=”local” Children=”force” />
<OptionState Id=”ProofingTools_1049″ State=”local” Children=”force” />
<OptionState Id=”ProofingTools_1048″ State=”local” Children=”force” />
<Setting Id=”SETUP_REBOOT” Value=”Never” />
</Configuration>
This bypasses all prompts in the setup process and installs 12 proofing languages. I’m not going to list the languages here (OptionState Id values), as there’s a table is available at: http://technet.microsoft.com/en-us/library/cc179219(v=office.15).aspx . That’s it for the configuration – now ready for deployment.
Source: http://technet.microsoft.com/en-us/library/ee942200(v=office.15).aspx plus all the forgotten ones…
Deploying Office Proofing Tools Kit 2016/Removing Proofing Tools Kit 2013/2010
Again, this information is already available in my previous blog post about deploying Office Proofing Tools 2013 SP1, so please have a look there before you continue. The difference in the 2016 version is that I will use different dependencies so that Office and the language packs will be installed before proofing tools is installed. I’ll also use Supersedence the same way I did with Office 2016 above.
Checking parameters for Proofing Tools Kit 2013 SP1 uninstallation:
First off, I’ll copy/paste information about the installation:
Edit “programs” tab. The installation command should now include our custom.xml instead of the MSI-command. The command I used was: setup.exe /config \\sccm2012r2\Software\Office_2013_Proofing_Tools_with_Service_Pack_1\proofkit.ww\config.xml. ( /config .\proofkit.ww\config.xml is an easier/better syntax, btw)
Ok – now you just have to add the uninstall information with a custom UNintallation xml-file. This is also the same procedure as with the Office 2016 deployment. Anyway, I created a custom2.xml file in the same location as mentioned above. It includes basically the same information as the Office 2013 SP1 uninstallation xml-file:
<Configuration Product=”Proofkit“>
<Display Level=”none” CompletionNotice=”no” SuppressModal=”yes” AcceptEula=”yes” />
</Configuration>
…and for the uninstall program string I’m using: setup.exe /uninstall Proofkit /config .\proofkit.ww\config2.xml
There you have it. Both the install and the uninstall information are now specified. You can now go ahead and make the same Supersedence rules as with the Office 2016 deployment:
Fig 7. Office 2016 Proofing Tools Kit – Supersedence.
Only thing that isn’t fully visible in the screenshot above is Application: Microsoft Office Proofing Tools 2013 SP1 – multilanguage.
You can now do the same thing with Office 2010 (proofing tools) if you want to uninstall/remove that version prior to installing proofing tools 2016. You’ll then add another supersedence rule so that BOTH Office 2010 proofing tools AND Office 2013 proofing tools will be superseded (both should then be in the list in Fig 7).
(I also specified the uninstallation information for Office 2016 (proofing tools) already, so I can (hopefully) use the same procedure with future versions of Microsoft Office).
Deploying Office 2016 language packs/Removing Office 2013/2010 language packs
Some people are also using language packs with Office so I had to figure out a way of uninstalling/replacing these with the 2016 versions. Luckily, Microsoft is using quite the same syntax as with proofing tools, so the task was actually quite simple. You start with the same procedure – checking for a valid config.xml file for installation and uninstallation. The difference here is that you don’t need any specific codes for the language(s), as one language pack only installs one specific language. Another nice thing is that you can use the SAME xml file for both the installation and the uninstallation. The custom.xml for the Swedish language looks like this for example:
<Configuration Product=”OMUI.sv-se“>
<Display Level=”none” CompletionNotice=”no” SuppressModal=”yes” AcceptEula=”yes” />
</Configuration>
That’s the only thing you need to add/edit to make it silent. The paths for the files are a bit different than with Proofing tools though. The xml file is in .\omui.sv-se (or omui.xx.xx for your own language). The MSI-file used for deployment (or actually only for getting the product code) is in the same directory. The installation and uninstallation strings are also a bit different. Let me show you some screenshots and whatnot from SCCM;
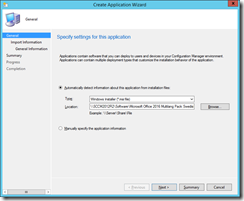
First off you create a new application and make it think it’s going to use a MSI file for installation. You do it like this only to get the detection method/MSI product code.
Fig 8. Create Application Wizard.
Use the path:
\\yoursccmserver\yoursoftwarestash\Microsoft Office 2016 Multilang Pack Swedish\OMUI.sv-se (or similar for another language) and select the file OMUI.msi
Then just next, next, next through the wizard.
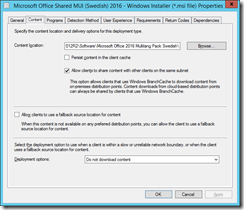
After this, you edit the Deployment Type. First off, go to the Content location. This path will be wrong (as the msi file is located in the OMUI.sv-se -directory). Please REMOVE “OMUI.sv-se” from the content location path. That’s it for content.
Fig 9. Office 2016 Swedish language pack content location.
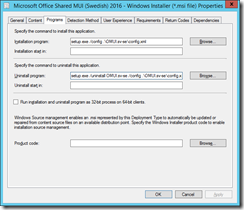
Then you move over to the “Programs” tab. Here’s where the magic happens. Remove all the text/strings from installation program and uninstallation program. Replace the text with the one from Fig 10 below.
Fig 10. Programs tab. Same xml is used for both installation and uninstallation (even though it got cut off in the screenshot).
In case you want to copy/paste, the strings are:
Installation program: setup.exe /config .\OMUI.sv-se\config.xml
Uninstall program: setup.exe /uninstall OMUI.sv-se /config .\OMUI.sv-se\config.xml
Sources:
http://www.itninja.com/question/how-to-install-office-language-pack-2010-unattended
https://technet.microsoft.com/en-us/library/cc179145.aspx
http://www.techygeekshome.co.uk/2012/11/office-2010-language-pack-deployment-in.html
You can now do the same thing with Office 2010 language packs if you want to uninstall/remove that version prior to installing the 2016 language packs. You’ll then add another supersedence rule so that BOTH Office 2010 language pack AND Office 2013 language pack will be superseded.
Dependencies/Finalization
There you have it. You’ve created separate SCCM applications for Office 2016, Office 2016 Proofing tools and Office 2016 language packs. That’s very nice and all, but you probably don’t like deploying all three applications separately, now do you? Well, this is where dependencies comes into play.
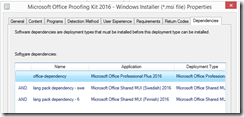
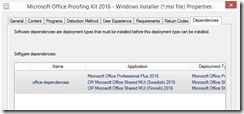
In my final deployment I ONLY deploy Office 2016 Proofing Tools. Office 2016 (main office application) is a dependency of Proofing tools, and so are the language packs. See Fig 11 for details.
NOTE! Create THREE SEPARATE dependency groups, otherwise there will be an “OR” statement instead of “AND”. I learned this the hard way when the language packs wouldn’t install. See the right and the wrong way to create the dependencies below:
Fig 11. Office 2016 Proofing Tools dependencies, the CORRECT way.
Fig 12. Office 2016 Proofing Tools dependencies, the WRONG way.
Update! As there is a bug with the Skype for Business shortcut icon, the shortcut will also be deployed as a dependency.
- First, create a new directory for your application (script) on your sccm server. Call it “Office2016-Skype for Business-shortcut” for example.
- Copy the Skype for Business 2016-custom shortcut (created in the Customizing Office 2016 part) to this directory.
- Create two new PowerShell script files in this directory;
- Name the scripts Office2016-Skype for business-shortcut.ps1 and Office2016-Skype for business-shortcut-uninstall.ps1 for example.
- Contents of Office2016-Skype for business-shortcut.ps1:
- Name the scripts Office2016-Skype for business-shortcut.ps1 and Office2016-Skype for business-shortcut-uninstall.ps1 for example.
copy “Skype for Business 2016.lnk” “C:\Users\Public\Desktop\Skype for Business 2016.lnk”
copy “Skype for Business 2016.lnk” “C:\ProgramData\Microsoft\Windows\Start Menu\Programs\Microsoft Office 2016\Skype for Business 2016.lnk”
- Contents of Office2016-Skype for business-shortcut-uninstall.ps1:
del “C:\Users\Public\Desktop\Skype for Business 2016.lnk”
del “C:\ProgramData\Microsoft\Windows\Start Menu\Programs\Microsoft Office 2016\Skype for Business 2016.lnk”
Create a new application using the following information:
- Create Application
- Manually specify the application information
- Name: whatever you like
- Deployment Types:
- Type: Script Installer
- Manually specify the deployment type information
- Name: whatever you like
- Content location: wherever you store your applications, in a subdirectory called “Office2016-Skype for Business-shortcut” for example
- Installation program: powershell.exe -executionpolicy Bypass -file “Office2016-Skype for business-shortcut.ps1”
- Uninstallation program: powershell.exe -executionpolicy Bypass –file “Office2016-Skype for business-shortcut-uninstall.ps1”
- Detection method: Setting type: File System: C:\Users\Public\Desktop\Skype for Business 2016.lnk AND C:\ProgramData\Microsoft\Windows\Start Menu\Programs\Microsoft Office 2016\Skype for Business 2016.lnk exist.
- Install for system, whether or not a user is logged on, hidden.
With all this done, create yet another dependency group. Add this newly created application to this dependency group. You then have a total of FOUR dependencies.
Source: https://tjindarr.wordpress.com/2012/05/04/application-dependencies-in-sccm-2012/
Summarization
Let’s sum it up:
- Actual deployment “object” is Office 2016 proofing tools, which in turn use dependencies (main office application + language packs).
- Office 2016 supersedes Office 2013.
- Office 2016/2013 removes/uninstalls Office 2010 via OCT (no supersedence).
- Proofing tools packages use supersedence to update themselves to the newest versions (2010 –> 2016, 2013->2016).
- Language pack packages use supersedence to update themselves to the newest versions (2010 –> 2016, 2013->2016).
- Office 2016 is a dependency of Proofing tools 2016, and so are the language packs (and the Skype for Business shortcut).
- A shortcut for Skype for Business is created in the Start menu and on the desktop. (It is NOT created via OCT as it creates a faulty one).
And some screenshots:
Fig 13. Downloading all of the needed packages/applications.
The number of downloaded components depend on which Office-components SCCM detects on the client. (Is Office already installed and are only the language packs needed, for example). I’ve now changed the application catalogue name of the “main” application to something more convenient than “Microsoft Office Proofing Tools 2016 – multilanguage”. Currently I’m using “Office 2016 with proofing tools + swe & fi language packs”.
Fig 14. Updating components. One done, seven to go.
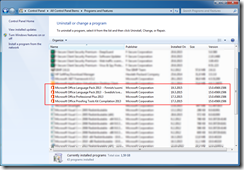
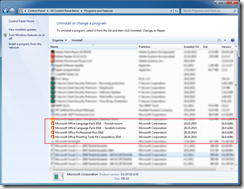
Fig 15. Before Office 2016 deployment. Office 2013 SP1 (with Proofing tools and two language packs). Same components are installed if using Office 2010.
Fig 16. After successful Office 2016 deployment. Same thing, new versions 🙂
Success! 🙂 (Finally… after many, many, many hours of testing)
BTW, feel free to comment if you find this post useful.





Great Post. This helped me solve the Skype for business feature (bug!) and was exactly what I was looking for. I resolved the supersedence 2013 > 2016 a little differently though. I selected the radio button “Remove the following earlier versions of Office..” in the OCT and selected everything I needed uninstalled (less infopath filler for our particular environment). That automatically uninstalled Office 2013 without needing to specify it as superseded in SCCM. I also added the regkey fix for excel preview in outlook in the OCT while I was at it.
Again, great post and thanks for blogging this information!
Well, the problem is that it doesn’t matter what I select in OCT, Office 2013 SP1 won’t be removed. This is however untrue if Office 2013 SP1 is unpatched (no recent windows updates), as it then gets uninstalled. I’d call this a (serious) bug. My goal was also to remove the complete Office package, not just a few components.
Thanks so much for sharing! I’ve spent hours and hours trying to solve many of these very same bugs since Oct and with your help, I was able to fix couple critical parts. I do have some questions and comments:
1.) You didn’t have to create Supersedence for 2010:
Was your 2016 upgrade able to remove the Office 2010 > SharePoint Workspace from the Start menu? What about Lync 2010?
I had to make a batch file for 2016 application to get these 2 removed. The content of my batch file: 1. Remove Lync 2. Remove 2010 proplus (same idea as the 2013 SilentUninstallConfig.XML you did.) 3. Install Office 2016.
2.) Silent uninstall 2010/2013:
On the .XML, display level = “none” but both of them still displayed the uninstall, (not silent)
3.) Powershell command would not work. Had to make a batch file too, to save the .lnk, by xcopy. Something to do with un-signed powershell I guess.
4.) In my 2016 OCT, I had to choose “Run all from my computer”, and it added a [F] in front of each program. Suggestion found from another blog.
Thanks again,
Hi,
1) True. OCT in 2016 is/was able to remove 2010. Well almost. It leaves SP Workspace as you said, but it isn’t a dealbreaker for us. Lync isn’t included in our Office 2010 version.
2) Not for me. If copy/pasteing, the (“) -letter/sign tends to be wrong. Other than that, no ideas…
3) I did not recall that problem, but thanks for commenting.
Made progress today with the silent install issue:
2013: ; I had “no” by mistake.
2010: It’s got “none” but not working. The fix is to add the /Silent switch to my 2016 setup.bat, ie:
“C:\program files (x86)\common files\Microsoft shared\office14\office setup controller\setup.exe” /Silent /uninstall Proplus /config “\\OurServerPath\SilentUninstallConfig.xml”
Woot.
Hi there, I am facing a new issue and wonder if you have seen this or maybe it’s in your road map.
Windows 10 does not seem to honor the OCT in terms of the sub-folder “Microsoft Office 2016 Tools” in the Start Menu. When I click on Start menu > All Apps > Scroll down to letter M > Microsoft Office 2016, it shows all tools in the same level as the Proplus apps (word, excel, outlook, etc.) Very messy looking. It did honor the “Microsoft Office 2016” directory I created in the OCT because for example originally Word was simply listed under “W”. Any insight? Thanks! More googling…
Hi,
no, I haven’t seen that specific issue. Then again, I’m not surprised. The whole OCT seems to be full of bugs, and new ones are to be discovered. As stated in the blog, I only created a folder called “Microsoft Office 2016”, and left the tools alone. For me, this approach created two specific folders, one for the tools and one for Office 2016 itself.
Happy new year!
This might be off-topic but these past 2 weeks I’ve been working on Office 2016 (Office 365) deployment and my issue for the Office 2016 Tools shortcut did not duplicate in Win10. Though, there are still tons of bugs and thought I’d post here. Maybe it’s on your plate as well, or in near future. =]
1. Office 2016 (O365) click-to-run does not use OCT anymore. It’s now called ODT and mainly utilizes the .xml file and not much we can tweak with it
2. My old comment on Dec 11th, regarding silent install. The /silent switch is not recognized by O365 anymore! After removing it, the install surprisingly went through and hey silent!
3. Due to ODT is so basic, there is no “shortcut” concept so each program (Word, Excel, PPT, Outook, etc.) just scattered all over the places and had to incorporate some mkdir & move commands in the batch file to group them. Though, as mentioned above, pretty surprised “Microsoft Office 2016 Tools” shortcut folder exists and with all the necessary tools are grouped in it.
4. The SCCM supersedence still only works on Office 2013 MSI removal. (not 2010)
5. Despite we excluded to install One Drive Business from ODT, it still decided to install One Drive (the basic one?!) People complained about it on some forums and Microsoft basically replied you have to remove it “manually”…
Thanks for reading. Looking forward to reading more about your ‘adventures.’ Best of luck.
I’ve got a better fix for the Skype shortcut, if you want it. If you’re good using what you’ve already got, no worries.
I’m good, but I’m also open to new ideas. So sure, I’m interested. (A bit tired of all the bugs by now though…)
What is the fix for the shortcut-problem?
I’m still having trouble with the Skype Shortcut problem, is there any new suggestions? Thanks.
@Adrian do you still have the problem? I found a Solution.
Do u have a better solution for the Skype-Shortcut-problem now?
I found a simpler fix for the Skype-shortcut problem (we use VL 2016 pro plus). In OCT, delete the Skype for business shorcut, then re-create it. OCT will set the target as “Lync_CoreFiles”. This will create the shortcut with the correct target.
Thanks for the tip!
Do you have the link to download Proofing Tools “CD” which include all of the proofing tool languages compilation 2016? Thanks
No, it’s from the Microsoft Volume License agreement downloads…
Hi thanks for your information.
But i have some problem on MultiLanguagepack & Proofing Tools.
It keep pop up microsoft license agreement and ask for accept.
I believe some code on config file may incorrect.
So, can anyone help to to take a look?
thank you so much.
<!– –>
<!– –>
<!– –>
<!– –>
<!– –>
<!– –>
<!– –>
<!– –>
<!– –>
–>
–>
i will deploy from SCCM, but i’m thinking do i have to edit ?
And if yes, can you give me some tips & how to do it?
Isaac
Be very careful when copy/pasting. Some characters might not copy ok. Especially the ” and ‘ -signs tends to fail.