Updating / Maintaining our Windows image

I just realised that I’ve never written about “regular maintenance” on our Windows 7/8.1 images. That said, I’ll try to write a short recap about the process. This procedure can be done in many different ways, but I’ll present my way of doing it. I’ll also write about an alternative (easier) method using sysprep and capture via MDT. Steps:

  • Started VMware and powered up a virtual machine with the old out-dated image. You should always use a virtual machine when making a golden image so you won’t end up with unnecessary drivers etc. in the image. Drivers will instead be added via MDT during deployment.
  • Ran Windows update. Updated everything.
  • Updated other software such as Firefox, Chrome, Skype and so on. My image-type is “fat”, so most of the programs are already in the image and won’t be added during deployment. This is a matter of taste though.
  • Didn’t change any local policies as they were up2date. This would be the time to change them if needed (using gpedit.msc)
  • Didn’t join the domain because none of the settings/changes needed domain membership. (The computer should NOT be domain joined when sysprepping either).
  • Took a snapshot in VMware before sysprepping. This step is important as you can repeat the steps above whenever you feel like making a new updated image. (You can only sysprep an already sysprepped image three times so snapshotting is your friend).
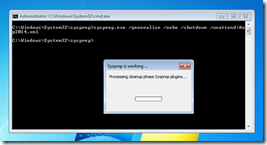
  • Ran sysprep from an administrative command prompt (Fig 1). If you’re interested in all the sysprep command line options, have a look at: http://technet.microsoft.com/en-us/library/cc721973%28v=ws.10%29.aspx. My command: sysprep.exe /generalize /oobe /shutdown /unattend:myfile.xml. There’s some stuff in myfile.xml that is specific to our University, but I won’t go into those details here. We sometime deploy computers manually (without MDT), so an unattend-file is needed. If you are interested in making your own unattend-file, look at http://technet.microsoft.com/en-us/library/cc748874%28v=ws.10%29.aspx or http://emeneye.wordpress.com/2012/02/23/building-an-unattended-answer-file-for-windows-7-2/ for examples.

          sysprep

          Fig 1. Sysprep

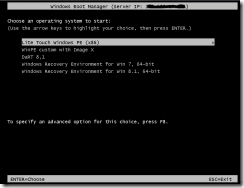
  • After this step the virtual machine is in a shutdown state. I will power on the virtual machine again, but this time choose to boot from the network (Fig 2; Windows Boot Manager has been loaded from the WDS server). The vm is connected to the same physical network as the WDS/MDT server.

          windows_boot_manager

          Fig 2. Windows Boot Manager.

          mount_deploymentshare_from_winpe

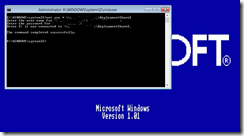
          Fig 3. Mounting the Deployment share from WinPE.

  • After the Deployment share is mounted, the next step is to capture the current image onto the share. The following command was used: imagex.exe /compress maximum /capture d:\ z:\win7image.wim “Image 29.8.2014” (Fig 4). The drive letters often gets mixed up in WinPE, so be sure to check that you are capturing the correct drive. In my case “the usual c:\” was mapped as d:\ , and therefore I’,m using the /capture d:\ -command above.

          capture_image_from_winpe

          Fig 4. Capturing the image. It’ll take  a while…

  • After a while you’ll have a captured image that you can add to your MDT-server (or just deploy manually with a WinPE Boot CD for example).
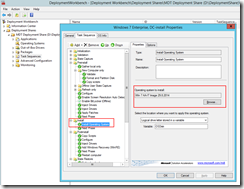
  • That’s it. Just add/import the newly created image to MDT (Fig 5, Fig 6) and remember to update the Task Sequence to use the newly created image (Fig 7).

          import_os_mdt

          Fig 5. Adding the image to MDT.

          import_os_mdt_importing

          Fig 6. Importing… it’ll take a while.

          check_os_in_mdt

          Fig 7. Updating the Task Sequence to use the new image

  • You can now revert your snapshot in VMware and do the above steps over and over again 🙂 (I reverted before I wrote the following chapter about the alternative method for example).
  • Deploy!


Alternative method:

With this method you’ll capture an image from an updated, “ready to be imaged” virtual machine with the following steps:

  • Start MDT and create a new Task Sequence. Select “Sysprep and Capture”. Fill in the fields with the needed information. Most of this information is already pre-stored in the image/vm that will be sysprepped and captured, but you’ll have to at least fill in Name and Organization. The product key will be taken from KMS, so no need to specify that in my case. The admin password can be specified or non-specified according to taste. However, when you deploy the image it  will still have a disabled administrator account. (A script renames and disables the admin account during deployment in my case).
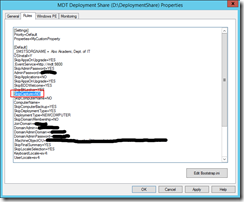
  • Verify/Edit the MDT rules. SkipCapture should be set to NO (Fig 8). I also set SkipDeploymentType=NO so that the wizard will ask me to capture an image (and also ask what to do with it). This setting was changed after the screenshot though.

           Skipcapture_no

           Fig 8. SkipCapture=NO

  • Move away from MDT and head back to your client.
  • Instead of manually entering the sysprep.exe –command, mount the MDT network share (\\WDSSERVER\DeploymentShare$) from your running non-domain joined virtual machine. After mounting the MDT share, navigate to the Scripts -directory and run “LiteTouch.vbs” (Fig 9).

           LiteTouch_vbs_from_win7

           Fig 9. Mounting Scripts folder and running LiteTouch.vbs

  • Choose the Sysprep and Capture Task Sequence that you created earlier (Fig 10).

           sysprepandcapture_ts

           Fig 10. Sysprep and Capture Task Sequence

  • Specify that you want to Capture an image of this reference computer (Fig 11). The default “Captures”-location is fine. Click next.

           sysprep_and_capture_location

           Fig 11. Capture an image of this reference computer

  • Sysprep starts and does its magic (Fig 12). After this the computer automatically restarts into WinPE and captures the image (Fig 13).

           sysprep_is_working_plz_wait

           Fig 12. Sysprepping

           create_wim_capturing

           Fig 13. Capturing the image (wim).


That’s it! Image is now captured and you are ready to deploy it.

You’ve now witnessed image making/capturing in two different ways. Even though Deployment is something I often work with, I can’t remember everything. I refreshed my memory with a little bit of help from http://www.vkernel.ro/blog/sysprep-and-capture-a-windows-image-with-mdt-2012.

As usual, if you are interested in the whole deployment process, read my earlier (popular) post Deploying Windows 7/8 with Microsoft Deployment Toolkit (MDT) 2012 Update 1 and Windows Deployment Services (WDS).

Migrating MDT 2013 from Windows Server 2008 R2 to Windows Server 2012 R2

Our Deployment Server (Windows Server 2008 R2) was getting a bit dated and I wanted to enjoy all the new WDS-features of Windows Server 2012 R2 (better UEFI support and enhanced boot image download performance for example). In this migration case I’ll be using physical servers so the migration will be physical-to-physical. The servers are old but they have enough power for the job 🙂

Old server (Fig 1):

  • Fujitsu Siemens Primergy RX300 S2
  • 2 x Intel Xeon 3.20GHz CPUs
  • 4GB RAM
  • 6 x 146GB SCSI HDDs in HW RAID-5

fusi_primergy

Fig 1. Fujitsu Siemens Primergy RX300 S2 (currently running Windows Server 2008 R2).

For the replacement/migration I originally had an identical server which ran Windows Server 2008 R2. It got upgraded to Windows Server 2012 some time ago however. I now tried upgrading it to Windows Server 2012 R2, but it just failed to start properly after the setup process was completed (error message and endless reboots). This was (probably) due to the same problem as before, as there are no drivers for the LSI MegaRAID 320-2E card. It was possible to trick the Windows Server 2008 R2 installation to use the Windows Server 2003 drivers (newest ones available), but this wasn’t the case with a clean install of Windows Server 2012 (R2). However, an upgrade from 2008 to 2012 was/is possible. As a server 2012 to server 2012 R2 upgrade wasn’t possible due to errors, I thought I’d try with the old method. That said, I clean-installed Server 2008 R2, and tried a Server 2012 R2 upgrade instead of the Server 2012 upgrade. This upgrade path wasn’t “allowed” by MS however, so I HAD to do a clean install. Well, I ran into the exact same problems as with the Server 2012 to Server 2012 R2 upgrade. The server won’t start properly, due to a very old and unsupported LSI MegaRAID card. Anyways, it was time to move on as I won’t waste any more time on these old bastards (Fujitsus).

This was not the end of the world though, I just used an old workstation instead of a server. It doesn’t have to be a hard-core server anyhow, because we usually don’t have many simultaneous deployments. It’s basically enough having a normal workstation with decent capacity hard drives in a raid configuration for safety (raid-1 or 5). Normally this sort of thing would be a good candidate for a virtual machine also, but our hosts are a bit full at the moment so it would’ve been even slower 🙂 With that said, here’s the “new server” (Fig 2):

  • Osborne (in an Antec Sonata III case) with Asus PQ5-EM motherboard
  • Intel Core 2 Duo 3.16GHz CPU
  • 4GB RAM
  • 2 x 250GB HDDs in HW RAID-1

sonataIII

Fig 2. “Osborne”

I installed the new “server” from scratch and copied over the needed content from the old server as the progress continued. Steps:

  • Installed Windows Server 2012 R2 from DVD
  • Ran Windows Update to get it fully patched
  • Installed Classic Shell (yes, I still don’t like Metro)
  • Installed Notepad++ for easier editing of configuration files
  • Installed Intel Rapid Storage Technology from Intel.com to monitor raid health (Fig 3). Also configured email alerts.

          intel_RST 

           Fig 3. Intel RST

  • Partitioned/Resized the hard drive: 60GB for the system drive and the rest for data (Deployment Share)
  • Downloaded and installed ADK 8.1 for Windows 8.1 Update
  • Downloaded and installed MDT 2013
  • Enabled WDS Server Role
  • Set a static IP
  • Joined the production domain
  • Copied the whole Deployment Share directory (about 60GB) from the old server to this new one, (D:\DeploymentShare)
  • Shared the new Deployment Share directory via file sharing
  • Started MDT 2013 and chose to Open Deployment Share. Pointed it to the newly copied directory, D:\DeploymentShare (Fig 4)

          open_deployment_share

          Fig 4. Open Deployment Share

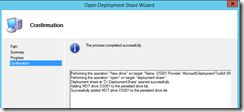
  • Successful import! (Fig 5)

          open_deployment_share_success

          Fig 5. Open Deployment Share – success.

  • Went to properties on the Deployment Share and changed UNC path to point to the new server (Fig 6)

          set_depl_share_unc_path

          Fig 6. Set Network (UNC) path

  • Edited D:\DeploymentShare\Control\Bootstrap.ini and changed DeployRoot to point to the new server (Fig 7)

          unc_path_inbootstrap_ini

          Fig 7. DeployRoot in Bootstrap.ini

  • Updated the Deployment Share. MDT-part now done.
  • Started WDS and configured it (kind of self-explanatory so won’t add any steps or screenshots)
  • Added the newly created boot image from MDT (D:\DeploymentShare\Boot\LiteTouchPE_x86.wim) to WDS Boot Images
  • Changed the TFTP Maximum Block size for better boot image download performance (Fig 8). This is a new feature in WDS on Windows Server 2012 (R2). More information: http://technet.microsoft.com/en-us/magazine/dn163597.aspx. Yeah, it’s actually noticeably faster.

          wds_tftp_max_block_size

          Fig 8. TFTP Maximum Block Size

  • Updated the DHCP configuration on our Linux DHPC server to point to the new server
  • Ran a test-deployment – Everything worked as before, except now I’m using a newer version of WDS with better UEFI support 🙂
  • Success yet again!


Source: http://lacietech.blogspot.fi/2010/10/migrating-mdt-2010-from-one-server-to.html

As usual, if you are interested in the whole deployment process/configuration, read my earlier post: Deploying Windows 7/8 with Microsoft Deployment Toolkit (MDT) 2012 Update 1 and Windows Deployment Services (WDS)

Making a custom WinPE image

There are many different guides on the Internet which describe how to make your own WinPE image (.wim or .iso). However, the instructions are different depending on which version of WinPE you are using. I’m writing this guide for WinPE version 5, which is part of Windows ADK 8.1. If you are completely new to WinPE, have a look at http://en.wikipedia.org/wiki/Windows_Preinstallation_Environment for example.

I’m using this image with WDS to pxe-boot computers. With WinPE (and WinRE) I can get details about the computer or do some minor troubleshooting etc. It’s convenient having pxe-boot enabled on the computers so you don’t have to worry about cd/dvd/usb boot media. I’m also using this WinPE image to boot my Windows-image-making virtual machine after I have sysprepped  it. After booting with WinPE I’m using imagex to capture my image. Example:

imagex.exe /compress maximum /capture c:\ z:\myimage.wim “myownimage”

(z:\ in this case is my manually mounted network share where I will store the image. Normally I’ll just mount my MDT Deployment share). More about integrating imagex in WinPE later on in the text. I’ll also write a couple of lines about making a (custom) WinRE image.


Creating the custom WinPE:

First, start of by downloading and installing Windows Assessment and Deployment Kit (Windows ADK) v. 8.1. Then run Deployment and Imaging Tools Environment (from Start Menu/Windows Kits/Windows ADK) with administrator rights. Once fired up, navigate to:

C:\Program Files (x86)\Windows Kits\8.1\Assessment and Deployment Kit\Windows Preinstallation Environment. From here enter:

copype.cmd x86 d:\winpe (for x86 architecture). This will automatically copy all of the needed WinPE files to the d:\winpe –directory.

We will now copy and mount the boot image (wimpe.wim). Copy it from the ADK installation folder (for example, <Installation path>\Windows Kits\<version>\Assessment and Deployment Kit\Windows Preinstallation Environment\<x86 or amd64>\<locale>) to a destination folder on the computer from which you will customize the boot image. I’ll copy it to my newly created d:\winpe directory, like so:

C:\Program Files (x86)\Windows Kits\8.1\Assessment and Deployment Kit\Windows Preinstallation Environment\x86\en-us>copy winpe.wim d:\winpe

Now it’s time to mount the boot image so we can make modifications to it. I’ll use the directory d:\winpe\mount.

dism /mount-wim /wimfile:d:\winpe\winpe.wim /index:1 /mountdir:d:\winpe\mount

Deployment Image Servicing and Management tool
Version: 6.3.9600.16384

Mounting image
[==========================100.0%==========================]
The operation completed successfully.

Image is now mounted and it’s time to make some changes to it. I’ll be adding the WMI package and the ImageX & BgInfo executables. I’ll also change system locale and replace the background picture. I won’t add any drivers at the moment (not needed).


Adding WMI package:

dism /image:d:\winpe\mount /add-package /packagepath:”C:\Program Files (x86)\Windows Kits\8.1\Assessment and Deployment Kit\Windows Preinstallation Environment\x86\WinPE_OCs\WinPE-WMI.cab”

I also added the Scripting, MDAC, and HTA packages in the same matter (needed for WMI).

WMI is handy if you want to get details about the computer model or manufacturer, among other things. Example query:

“WMIC computersystem get manufacturer” or WMIC “computersystem get model”

This information can then be used to inject drivers in MDT based on computer model or manufacturer.


Checking locale:

Dism /image:D:\winpe\mount /Get-Intl

Deployment Image Servicing and Management tool
Version: 6.3.9600.16384

Image Version: 6.3.9600.16384

Reporting offline international settings.

Default system UI language : en-US
System locale : en-US
Default time zone : Pacific Standard Time
User locale for default user : en-US
Location : United States (GEOID = 244)
Active keyboard(s) : 0409:00000409
Keyboard layered driver : PC/AT Enhanced Keyboard (101/102-Key)

Installed language(s): en-US
  Type : Fully localized language.

The operation completed successfully.

Adding swedish locale etc:

dism /image:D:\winpe\mount /Set-SysLocale:sv-se
dism /image:D:\winpe\mount /Set-UserLocale:sv-se
dism /image:D:\winpe\mount /Set-InputLocale:041d:0000041d

checking settings again:

dism /image:D:\winpe\mount /Get-Intl

Deployment Image Servicing and Management tool
Version: 6.3.9600.16384

Image Version: 6.3.9600.16384

Reporting offline international settings.

Default system UI language : en-US
System locale : sv-SE
Default time zone : Pacific Standard Time
User locale for default user : sv-SE
Location : Sweden (GEOID = 221)
Active keyboard(s) : 041d:0000041d
Keyboard layered driver : PC/AT Enhanced Keyboard (101/102-Key)

Installed language(s): en-US
  Type : Fully localized language.

Good! I’m happy with these 🙂


Adding imagex (for capturing an image from WinPE):

Create a folder in which the tool(s) are stored:

mkdir d:\winpe\mount\Tools

Copy imagex.exe to this directory:

copy “c:\Program Files (x86)\Windows Kits\8.1\Assessment and Deployment Kit\Deployment Tools\x86\DISM\imagex.exe” d:\winpe\mount\Tools

Then we add a custom script to the same directory. The script tells which files should be saved in the process and which files should be compressed and so on:

notepad d:\winpe\mount\Tools\Wimscript.ini

In my case, I have this information in the ini-file:

[ExclusionList]
ntfs.log
hiberfil.sys
pagefile.sys
“System Volume Information”
RECYCLER
Windows \ CSC

[CompressionExclusionList]
*. Mp3
*. Zip
*. Cab
\ WINDOWS \ inf \ *. Pnf

I also copied the BgInfo program to the Tools dir just for fun.

d:\temp\bg>copy Bginfo.exe d:\winpe\mount\Tools
        1 file(s) copied.


Changing the background image:

Change the security permissions of the Windows PE background image file (d:\winpe\mount\Windows\System32\winpe.jpg). This allows you to modify or delete the file.

  • In Windows Explorer, navigate to d:\WinPE\mount\windows\system32.
  • Right-click the d:\WinPE\mount\windows\system32\winpe.jpg file, and select Properties > Security tab > Advanced.
  • Next to Owner, select Change. Change the owner to Administrators.
  • Apply the changes, and exit the Properties window to save changes.
  • Right-click the d:\WinPE\mount\windows\system32\winpe.jpg file, and select Properties > Security tab > Advanced.
  • Modify the permissions for Administrators to allow full access.
  • Apply the changes, and exit the Properties window to save changes.

Replace the winpe.jpg file with your own image file. I replaced mine with this one 🙂

http://bfarber.com/screens/%5B2476%5DWindows_1.JPG

Source: http://technet.microsoft.com/en-us/library/hh824972.aspx#AddWallpaper


Commit all changes back to the image:

dism /unmount-wim /mountdir:d:\winpe\mount /commit

Deployment Image Servicing and Management tool
Version: 6.3.9600.16384

Image File : d:\winpe\winpe.wim
Image Index : 1
Saving image
[==========================100.0%==========================]
Unmounting image
[==========================100.0%==========================]
The operation completed successfully.

Done.

Now just copy this image to your WDS server (or make a bootable cd/usb stick).

If you feel like creating a (bootable) iso file, here’s the step:

OSCDimg.exe -n -bD:\winpe\fwfiles\etfsboot.com D:\winpe\media D:\winpe\winpe5_x86.iso


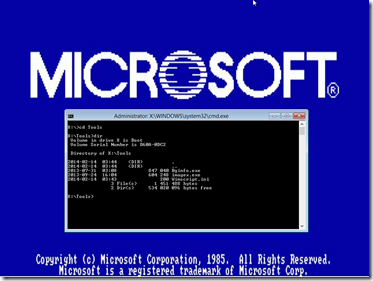
Here are some screenshots of my custom WinPE running in a virtual machine (pxe-booted from the wds server):

winpe_customized1

Fig 1. Look at that sexy Windows 1.01 background image 🙂 Also notice my Tools in the “Tools” directory.


winpe_customized2

Fig 2. Demonstrating WMI query. Very useful for scripting etc. in MDT.


winpe_customized3

Fig 3. BgInfo in action (with default settings). Can’t have too much information, right? 🙂


Making a WinRE image:

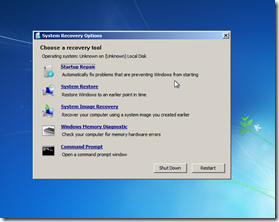
I’ll also add a WinRE image to my wds server. This is handy for minor troubleshooting or if you have to restore a computer from a Windows backup. WinRE uses the same troubleshooting tools that you get when you boot from a Windows 7/8 DVD (on the opening Windows 7/8 screen, clicking Repair Your Computer). Same tools are also available if you have created a Windows System Repair Disc. Anyways, on to the creation of the image.

Start off in the same way as with WinPE (instructions above), that is:

copype.cmd x86 d:\winpe (for x86 architecture). This will automatically copy all of the needed WinPE files to the d:\winpe –directory.

Then we need to copy the boot image from a Windows 7/8 DVD, because WinRE isn’t part of Windows ADK. First, mount your Windows 7/8 DVD (G:\ in my case), and then copy/export the boot.wim from it:

imagex.exe /export /boot G:\sources\boot.wim 2 d:\winpe\winre.wim “Windows Recovery Environment”

then we mount the image:

imagex.exe /mountrw d:\winpe\winre.wim 1 d:\winpe\mount

After this we add a script so that the WinRE-environment (recenv.exe) will auto-start.

  • Create a file called Winpeshl.ini. Save it wherever you like. Add the following information to the file:

[LaunchApp]
AppPath=X:\sources\recovery\recenv.exe

  • Copy the file to the \Windows\System32 directory in your working Windows PE directory, in my case, d:\winpe\mount\Windows\System32

Capture the image:

imagex.exe /unmount /commit d:\winpe\mount

Copy the winre.wim to your wds server and use it 🙂 (I created one WinRE image for Windows 7 and one for Windows 8).

Source: http://technet.microsoft.com/en-us/library/cc749147%28v=ws.10%29.aspx


Here are some screenshots of my WinRE images running in a virtual machine (pxe-booted from the wds server):

winre_win81__1

Fig 4. WinRE (Windows 8.1- version) running pxe-booted from wds.


winre_win81__2

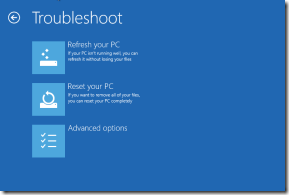
Fig 5. WinRE (Windows 8.1- version) running pxe-booted from wds (advanced options).


winre_win7

Fig 6. WinRE (Windows 7- version) running pxe-booted from wds.


Now go enjoy your newly created custom WinPE & WinRE images 🙂


Sources:

http://technet.microsoft.com/en-us/library/dn387582.aspx
http://technet.microsoft.com/en-us/library/hh824972.aspx
http://technet.microsoft.com/en-us/library/hh824926.aspx
http://forum.acronis.com/forum/9892
http://msdn.microsoft.com/en-US/goglobal/bb964664.aspx
http://www.gtkdb.de/index_27_1812.html

Converting a Windows 8.1 BIOS installation to UEFI

I got my hands on a Sony Vaio Pro 13” Ultrabook (very nice laptop btw) which originally came equipped with the basic version of Windows 8. It was going to be used as a work computer however, so I decided to install our Windows 8.1 Enterprise image on it. That said, I noticed that the current Windows installation was an UEFI installation of Windows 8. Our own image doesn’t include the needed partitions for UEFI, so it isn’t deployable as an UEFI installation (without MDT or partition modifications). MDT 2012 and newer are able to deploy both BIOS and UEFI versions from the same image but I didn’t test that stuff just yet. I don’t have a spare workstation with UEFI to test on either 😦 Update: I was able to test UEFI in combination with MDT 2013 and WDS in VMware workstation, more info later in the document. Update 2: I have now also tested a “real life” computer (HP Compaq Elite 8300 workstation) with UEFI PXE enabled in the bios. I can confirm that the WDS-server indeed HAS to be version 2012 (R2). I tried with the old Windows Server 2008 R2 and the boot image was NOT found. This statement can of course be untrue with other computer brands. I also enabled fast boot in the bios on the Elite 8300 after successful deployment, but I can’t really tell if it boots faster than before. At least it works, but it’s probably more noticeable on laptops.

Some info about UEFI in MDT:

“By default, MDT creates the appropriate partitions to support computers running UEFI. MDT supports UEFI versions from 2.0 up to 2.3.1. UEFI 2.3.1 is a newer version of UEFI that will be used on Windows 8 logo–compliant computers.
For more information about UEFI support in MDT, see the section, “Deploy to Computers with UEFI”, in the MDT document Using the Microsoft Deployment Toolkit.”
Source: http://www.edugeek.net/forums/downloads/125660-microsoft-deployment-toolkit-mdt-2013-a.html

I saw different requirements for the WDS server also; some say that UEFI pxe-booting works with Windows Server 2008 R2, and some say it requires Windows Server 2012. I can confirm that it works with Server 2008 R2 for 64-bit clients at least. Some links:

http://social.technet.microsoft.com/Forums/en-US/8cfa4b2d-a20d-4201-8568-f77da388d5f5/does-server-2008-r2-support-uefi-pxe-boot-for-wds
http://www.windows-noob.com/forums/index.php?/topic/8045-trying-to-deploy-over-pxe-uefi-x86-with-wds-2012/

Sony isn’t our main brand so it was unnecessary to add a bunch of drivers for it in MDT. UEFI isn’t in use on many of our computers either so I’ll put the whole UEFI with MDT on hold for a while. Now it’s time for some old school manual labor with a Boot CD and ImageX + diskpart 🙂

Here’s the process:

  • Entered the bios on the Sony and changed boot device from UEFI to Legacy. I also changed the boot order so it would boot from CD/DVD as first boot device.
  • Booted from a WinPE 5.0 CD (Windows 8.1 install DVD is also fine).
  • Ran diskpart with the commands “list disk”, “select disk 0”, “clean”. This cleans the whole disk and partitions
  • Created a new primary partition, “create partition primary”. I could have created more partitions NOW and not later, this way I would have had the computer UEFI-ready instantly. See the Conversion to UEFI step. It did work fine this way also, just more (unnecessary) steps…
  • Made it active with the command “active”.
  • Formatted the partition, format fs=ntfs label=”Windows 8” quick
  • Assigned drive letter, “assign letter=c”
  • Exited diskpart with “exit”
  • Applied the image (from a usb hard drive) with ImageX (integrated on my WinPE CD).
  • Imagex.exe /apply path-to-Windows81.wim 1 c:
  • bcdboot c:\Windows
  • Exit. Wait. Done.
  • I now have a regular mbr/ntfs image applied and running.


Conversion to UEFI

With the laptop still running in “normal bios/legacy mode”, I did the following:

  • Installed EaseUS Partition Master Free (http://www.partition-tool.com/) in Windows.
  • Created an unallocated chunk of disk space “to the left” of the Windows partition. Mine was 350MB. If you already have a 300+ MB system partition you can skip this step. I didn’t have one though as I didn’t create one in the steps above. MDT creates this system partition for you automatically if you deploy with that and not manually.
  • Formatted the partition and gave it a drive letter. Doesn’t matter which drive letter you give it as it’s going to be partitioned (and formatted) again real soon. I could have left it unformatted/unallocated also.
  • Downloaded gptgen (http://sourceforge.net/projects/gptgen/). This is needed to convert the whole disk to GPT (GUID Partition Table). GPT is needed for UEFI, and in turn UEFI is needed for Secure Boot (if you choose to enable it).
  • Ran gptgen.exe –w \\.\physicaldrive0 from an administrative command prompt. (You get the drive number from Windows Disk Management, usually 0). After this, the computer won’t/can’t boot with normal legacy mode anymore so you MUST boot the computer with the WinPE or Windows installation disk.
  • Restarted the computer and booted with the WinPE CD
  • Time for diskpart again:
  • diskpart
  • list disk
  • select disk 0
  • list partition
  • Showed me two partitions, Partition 1 which was the newly created one (350MB) and the other which was my Windows installation (120GB)
  • I selected the the 350MB’s partition and deleted it, “select partition 1”, “delete partition”
  • Created new partitions for EFI and system:
  • create partition EFI size=100 offset=1
  • format fs=fat32 label=”System” quick (EFI partition should be fat32)
  • assign letter=S
  • create partition msr size=128 offset=103424
  • Listed the partitions again, “list partition”
  • Partition ###  Type              Size     Offset
           ————-  —————-  ——-  ——-
           Partition 1    System             100 MB  1024 KB
           Partition 2    Reserved         128 MB   101 MB
           Partition 3    Primary            120 GB   229 MB

  • Partition 3 is my Windows partition
  • list volume
  • select volume 3 (my Windows 8 Volume, not same as Partition, just happen to be “3” in both cases)
  • assign letter=c
  • exit diskpart
  • bcdboot c:\Windows /s s: /f UEFI
  • restarted computer and enabled UEFI in bios.
  • Worked! Enjoy!

Source: https://social.technet.microsoft.com/wiki/contents/articles/14286.converting-windows-bios-installation-to-uefi.aspx

Configure UEFI/GPT-Based Hard Drive Partitions: http://technet.microsoft.com/en-us/library/hh824839.aspx

P.S. This has to be the fastest (Windows 8.1) computer I’ve ever tested. Bootup and restart only takes a couple of seconds due to UEFI and Windows 8 Fast Boot feature.


Bonus: UEFI PXE-Windows 8 Deployment in VMware Workstation 9

This was actually quite an easy task. It also answered some of my earlier questions regarding the PXE/WDS server version. I had an old virtual machine named “miffo” which was my old test deployment client. It had Windows 8 running at the moment (not that it matters). I opened up up the configuration file for the vm, namely miffo.vmx. I added an extra line into the file: “firmware=”efi”.

Source: http://community.landesk.com/support/docs/DOC-27736

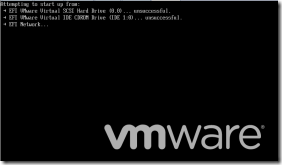
Now I could boot the virtual machine with an UEFI-enabled “bios” (Fig 1). EFI-boot from hard drive should be unsuccessful due to the fact that the current installation is using bios/mbr and UEFI can’t boot from mbr.

efi_vmware

Fig 1. EFI boot.

Just as with “normal” pxe-boot, the client contacted the pxe server (Fig 2). NOTE: The LiteTouchPE boot image HAS to be 64bit. If you boot with x86 architecture it will fail (vm will eventually shut itself down). As far as I know, this should be fixed in WDS for Windows Server 2012 (better support for UEFI and x86). I’m using Windows Server 2008 R2 WDS/PXE in my test environment so I wouldn’t know…

pxe_loadingfiles

Fig 2. PXE booting

After this everything was running as normal. You choose your task sequence and sit back and enjoy the show. I did not change anything in the task sequence regarding “Format and Partition Disk”, but MDT was smart enough to partition the disk correctly despite that (Fig 3).

gpt_uefi

Fig 3. Gpt + UEFI partitions created automatically

Same thing checked after successful deployment (Fig 4):

diskpart_from_windows8

Fig 4. Gpt + UEFI partitions again

And just to make sure we’re running UEFI (Fig 5):

msinfo32

Fig 5. System Information (msinfo32.exe)


This little test shows that UEFI deployments can be rather pain-free. Hopefully the same goes for production environments. Fingers crossed.

Some more links regarding UEFI and fast boot:

http://blogs.msdn.com/b/b8/archive/2011/09/20/reengineering-the-windows-boot-experience.aspx (especially the fast boot video)
http://blogs.msdn.com/b/b8/archive/2011/09/08/delivering-fast-boot-times-in-windows-8.aspx
http://blogs.msdn.com/b/olivnie/archive/2012/12/14/windows-8-fast-boot.aspx
http://blogs.msdn.com/b/b8/archive/2011/09/22/protecting-the-pre-os-environment-with-uefi.aspx
http://www.techrepublic.com/blog/windows-and-office/how-windows-8-hybrid-shutdown-fast-boot-feature-works/

It would be nice to have the Windows 8 Fast Boot feature on a workstation also, but that requires UEFI GOP support from the graphics card. This isn’t probably a big deal if you have an integrated graphics card on the motherboard, but for people with an (older) add-on graphics cards there can be problems. My own workstation graphics card (Nvidia Quadro NVS 450, non-integrated) won’t support UEFI GOP for example 😦 This is yet to be tested on another workstation (even though this feature is much more desirable on laptops).

Upgrading MDT 2012 Update 1 to MDT 2013

Update December 2015: The method below also works for updating MDT to MDT 2013 Update 1 (needed for Windows 10 deployment). Just install ADK 10 instead of ADK 8.1.

Now that Windows 8.1 is out it’s time to upgrade the MDT and ADK versions on the deployment server. My Windows 8.1 image is also ready for deployment and I need these new versions to deploy it. I started out by testing in my virtual environment. My steps:

  • Uninstalled old ADK version 8.0
  • Installed newest ADK version 8.1
  • Installed MDT 2013 on top of MDT 2012 Update 1 (“upgrade”)
  • Started Deployment Workbench after the upgrade and was greeted by the following:

upgradedeplshare

Fig 1. Unable to restore deployment share

  • No problem, upgrading the deployment share (right click, upgrade) fixed that problem (Fig 2).

upgradedeplshare_success

Fig 2. Upgrading deployment share

  • After upgrading the deployment share I regenerated a new boot image (Fig 3)

regeneratebootimage

Fig 3. Regenerating the boot image

  • Added the new boot image into wds (Fig 4). This new boot image (v. 6.3.9600) uses WinPE 5.0.

wdsupdatebootimage

Fig 4. Updating boot image in wds


That’s it! I did the same upgrade on the production server without problems. Old task sequences work fine, and my new Windows 8.1 deployment/task sequence also works like a charm.

(For a more detailed description of the whole deployment process, read my earlier post Deploying Windows 7/8 with Microsoft Deployment Toolkit (MDT) 2012 Update 1 and Windows Deployment Services (WDS)).

Deploying Windows 7/8 with Microsoft Deployment Toolkit (MDT) 2012 Update 1 and Windows Deployment Services (WDS)

This document is a bit dated, I wrote it back in November 2012 (with some small updates later on).


Lab environment


I started out in a lab environment and moved over to production environment when everything was working as expected. My testing environment was (is) VMware Workstation.

I have to say that all the guides I found on the Internet were a bit confusing, but I finally got it working the way it should. I’ll try to recap my steps, and hopefully it won’t be as confusing for others trying to build a similar environment.


I basically followed these steps:


· Installed Windows Server 2008 R2 Datacenter in a Virtual Machine.

· Configured the Virtual Machine:

o   Network as host-only with a static IP-address.

o   Added a second virtual hard drive. It’s best practice to have the deployment share on a different drive/partition.

· Installed  the necessary software:

o   .NET Framework 3.5 from Server Manager, Features

o   Windows Automated Installation Kit (AIK) v. 3.0 (Update: please use Windows ADK)

o   Microsoft Deployment Toolkit (MDT) 2012 Update 1

· Installed necessary Server Roles for WDS:

o   Active Directory Domain Services Server Role

o   DNS Server Role (configuration documentation not included for lab environment)

o   DHCP Server Role (configuration documentation not included for lab environment)

· Copied a plain Windows 7 Enterprise 64-bit image to the server

· Copied  our production .wim-image to the server (also Windows 7 Enterprise 64-bit)


MDT


Now the server was ready for configuring the most important part, Microsoft Deployment Toolkit (MDT) 2012 Update 1. As I said before, many guides are available on the Internet but they can be confusing. One guide that helped me was:

http://www.vkernel.ro/blog/deploying-windows-7-with-wds-and-mdt-2010-part1

Thanks to the author for this one. Kept me going without giving up Smile

Anyways, I’ll try to recap my steps:


· Created a new Deployment share, D:\DeploymentShare$ in my case.

o   Disabled every step in options (wizard panes)

· You’ll end up with a very basic vanilla Deployment Share. This has to be heavily customized for your own environment.

· Add Operating System(s) either from Source (DVD) or from an image file (.wim). There are a couple of questions to answer during the OS import, but they can be googled if not self-explanatory.


clip_image002

Fig 1. Adding Operating Systems in MDT 2012


· Above is a screenshot with two Operating Systems added. This is enough for my deployment. I used an old domain-image, which I installed in a virtual machine. I updated all programs and added some new ones. I then sysprep’ed the virual machine and made an image with ImageX. (Took a snapshot before this so it’s easy to revert). You can use other techniques to sysprep and capture (MDT’s own Task Sequence for example), but I used imageX because I’ve done it before. You now have your “Golden Image”, which can be deployed straight away or modified by adding Applications or injecting drivers etc.

· Much of the important settings are available when you right click the deployment share and choose properties. Fig 2. shows a screenshot of the default rules for the deployment share. Much can (and should) be changed. I’m not going through every setting here as you can find help online, for example:

http://scriptimus.wordpress.com/2011/05/06/mdt-2010-skipping-deployment-wizard-pages/


clip_image004

                Fig 2. Default Rules for the Deployment Share. 


Screenshots are better than text, so here are my rules after modifications. Almost all dialogs are bypassed, except machine name and domain. I also configured logging, as it’s nice to know if something went wrong (SLShare=\\WDS\Logs)


 clip_image006

                 Fig 3. CustomSettings.ini (Rules)


WDS


Time to move along to the wds-part. I’ve already installed the wds server role so now it’s time to configure it.


· Start wds, right-click your server and choose configure server.


· The instructions will tell you to add the default images (Install.wim and Boot.wim) that are included in the Windows 7 installation DVD (in the \Sources folder). This is where it gets a bit confusing (at least for me). DO NOT add the install image, JUST the boot image. This way, you just boot from the wds-server, and can point the installation to use an install image from your mdt share.


· Go back to MDT and choose properties on your Deployment Share. Go to the Rules tab. Click Edit Bootstrap.ini, down in the right corner. Edit the file according to your environment. Here’s a screenshot of my customized file:  
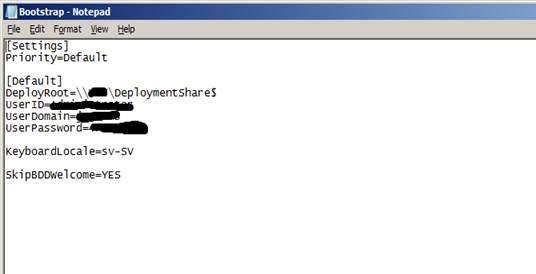
 

            clip_image008


    Fig 4. Bootstrap.ini                     


· Every time you change a setting in Rules or Bootstrap.ini in MDT, you’ll have to UPDATE THE DEPLOYMENT SHARE (right click deployment share). This wasn’t that well documented.

Also, if you make changes to the Boot Image configuration (Bootstrap.ini), you will HAVE TO REPLACE the Lite Touch Windows PE (x64) boot image in WDS (right-click the current boot image and choose replace) after you have updated the deployment share. Otherwise wds will boot with the old boot image. Choose the file from your Deplyment Share\Boot\ LiteTouchPE_x86.wim. 

         clip_image010

            Fig 5. WDS


Back to MDT – Task Sequences


Anyways, back to MDT. Now it’s time to make some Task Sequences which basically tells MDT what to do before, during and after Deployment. This is where the magic happens.  


clip_image012

 Fig 6. MDT, Task Sequences.


· Right click Task Sequences, choose New Task Sequence

· Give it an ID, Name and optionally a comment

· Choose Standard Client Task Sequence (I won’t look into the other options in this document, though I will probably test them further on)

· Choose your desired Image (Operating System)

· Fill in the other information to suit your needs

· Do not specify an Administrator Password at this time

· Right click or double-click to configure your newly created Task Sequence


Have a look at all the default options from your newly created Task Sequence. Modify and test-deploy to look at different options. Google and learn. I won’t go into details of all of the options as it would take forever. Information is available online, just use it.


I haven’t modified that much as my current image has most of the important settings already. I had a look at the partitioning (Preinstall/Format and Partition Disk) and changed the volume label. 100% disk use was good for me, so I didn’t change that. It’s easy to change it later according to your needs.


I have a custom script that configures MDT to allow the graphics driver auto detect method to set the screen resolution. Thanks to Johan Arwidmark for this script. Won’t paste the code here as it’s a bit too long…

(Source: http://www.deploymentresearch.com/Blog/tabid/62/EntryId/70/Going-Production-Deploy-Windows-8-using-MDT-2012-Update-1.aspx )


I also have a custom script that renames and disables the local Administrator account. It runs last in the “State Restore” process of the deployment. It’s added via Add/General/Run Command Line and moved to the correct place in the sequence. It runs a command line “cscript.exe “%SCRIPTROOT%\DisableAdmin.vbs” which basically runs a custom script from the default “Scripts” dir. Included in this script is the following information:


strComputername = “.”

Set objUser = GetObject(“WinNT://” & strComputername& “/Administrator”)


 objUser.SetPassword “thePasswordFromCustomSettings.ini”

 objUser.AccountDisabled = True

 objUser.SetInfo


 Set objWMIService = GetObject(“winmgmts:\\” & strComputerName & “\root\cimv2”)


 Set colAccounts = objWMIService.ExecQuery (“Select * From Win32_UserAccount Where LocalAccount = True And Name = ‘Administrator'”)


 For Each objAccount in colAccounts

     objAccount.Rename “OldLocalAdm”

 Next


(Source: http://social.technet.microsoft.com/Forums/en-US/itprovistadeployment/thread/87b61d5e-7085-465d-a2f0-5b5d131c6670#933ec6db-87ff-4b55-8f85-b190880f8e17 )


Deployment


Now it’s time to test the deployment process. You should already have configured wds with a boot image so that the clients can boot from it. You should also have specified the correct settings in Bootstrap.ini so that the Deployment Share (images) can be found from wds.


· Make an “empty” virtual machine

· Configure it to pxe-boot

· Start it

· Press F12 to boot from the network

· Your WDS-server is found

· Start Deployment and follow on-screen instructions 
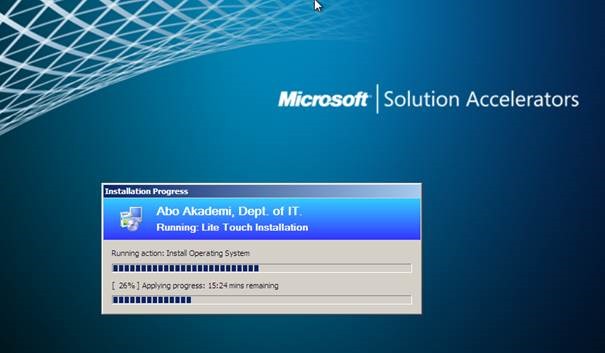
 

clip_image014

Fig 7. Actual Deployment process/progress


Production environment


The setup is obliviously different in the production environment. The wds-server is on our internal network, but has access to the public network (AD) via NAT. I’ll start with a picture of the whole setup to give you an idea of the configuration. 
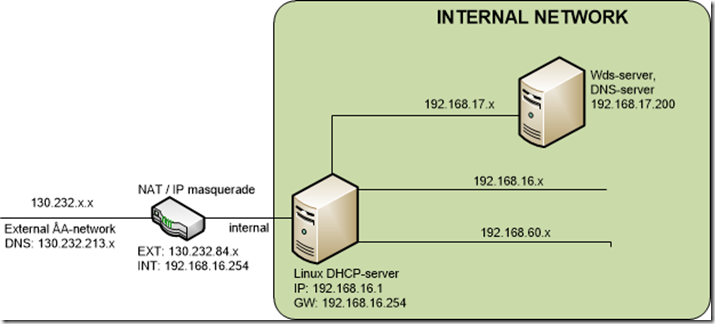
 

image

                                                                                                             Fig 8. Production Setup


Basically what we have here is a linux computer that is used to NAT/IP masquerade the traffic to the internal network. On the internal part we have a different linux dhcp-server that gives out leases to all of our internal clients. Three different subnets are configured, but the .17.x is used for our wds-server. The linux dhcp server will have to be configured to understand to boot from the windows wds-server. More on that later on.

The steps for installation are basically the same as for the lab environment, except for the dhcp-server and (no) AD. Here’s a list:


· Installed Windows Server 2008 R2 Datacenter (in a Virtual Machine on a VMware ESXi 3.5 server)

· Configured the server:

o   Network with static IP-address.

o   Added a second (virtual) hard drive. It’s best practice to have the deployment share on a different drive/partition.

· Joined the server named “wds” to the production domain

· Installed  the necessary software:

o   .NET Framework 3.5 from Server Manager, Features

o   Windows Automated Installation Kit (AIK) v. 3.0

o   Microsoft Deployment Toolkit (MDT) 2012 Update 1 

· Installed necessary Server Roles for WDS:

o   WDS Server Role

o   DNS Server Role (not actually used, more on the configuration later on)

o   Didn’t install DHCP Server Role, as I’m using the existing linux dhcp server  (more on the configuration in next chapter)

· Copied a plain Windows 7 Enterprise 64-bit image to the server

· Copied  our production .wim-image to the server (also Windows 7 Enterprise 64-bit)


The steps for MDT are exactly the same as in the Lab environment. Same goes for WDS, except that I configured the server to boot from the production share. Some small changes in CustomSettings.ini (Rules) are made, for example domain and username/password.


Linux DHCP


As I said before, I decided to use our existing linux dhcp-server for pxe-booting. For this to work, I added the following to /etc/dhcp3/dhcpd.conf :


subnet 192.168.17.0 netmask 255.255.255.0 {

        range 192.168.17.10 192.168.17.250;

        option domain-name-servers 130.232.213.x;

        # option domain-name-servers 192.168.16.200;

        option routers 192.168.17.254;

        next-server 192.168.16.200;

        option tftp-server-name “192.168.16.200”;

        option bootfile-name “boot\\x86\\wdsnbp.com00”;


and restarted the dhcp-server, /etc/init.d/dhcp3-server restart.


(Source: http://tspycher.com/2011/03/booting-into-wds-windows-deployment-service-from-linux-dhcpd/)


Now the test client booted nicely. Here’s a screenshot:


clip_image018

Fig 9. PXE-booting from wds.


All wasn’t that good though. My Deployment Share wasn’t accessible due to dns errors. I got “A connection to the deployment share (\\WDS\DeploymentShare) could not be made”.

I pressed F8 to get into console mode and to do some error checking. I could ping my wds server via IP-address so the problem was dns. A quick configuration check on the linux dhcp server revealed the problem, my dhcpd.conf had the dns option:

domain-name-servers 130.232.x.x; (external).

I changed this to our own internal dns server (192.168.16.200).This dns server was also configured with forwarders to our external network (130.232.x.x.) so name resolution works for both internal and external hosts. Good idea in theory, not in practice. Here’s a screenshot of DNS on the wds server.


clip_image020

Fig 10. Windows DNS Manager on wds-server


WindowsPE still can’t access \\wds via short name. Somehow I get the external dns-suffixes even though I have configured the hosts to use the internal dns server (and suffixes) in dhcp.conf. 

Also, option domain-search “intra.abo.fi”, “xxx.fi”, “xxx.fi”; in dhcpd.conf gives me errors and I have no idea why Sad smile


root@iloinen:/etc# /etc/init.d/dhcp3-server restart

dhcpd self-test failed. Please fix the config file.

The error was:

WARNING: Host declarations are global.  They are not limited to the scope you declared them in.


Well I tried declaring them globally also… still no luck.


/etc/dhcp3/dhcpd-iloinen.conf line 167: unknown option dhcp.domain-search

option domain-search “intra.abo.fi”

Configuration file errors encountered — exiting


I finally gave up with dns names and used IP addresses instead. It’s not the prettiest solution, but at least it’s working. Clients are now contacting \\192.168.16.200\DeploymentShare instead of \\WDS\DeploymentShare. Success, finally Smile


Note to self: If a computer exists in AD, it won’t join the domain during deployment. From logs:

NetSetup.LOG:

12/14/2012 09:34:46:923 NetpModifyComputerObjectInDs: Computer Object already exists in OU:


There is probably an easy workaround for this, but for me the easiest way was to remove the computer from AD before deployment.


My image is now finally deployed to a (physical) test computer. Success! Smile Further enhancements/tweaks can of course be done, and I’m writing about a few of them now. Total time for deployment (12GB compressed image) was about 30minutes over 1Gbit LAN.


Adding Applications


One thing you probably want to do is add different applications to your image after/during deployment. It’s quite easy (at least for basic applications), and the thing you need are the switches for silent install and so on. I tried adding Adobe Acrobat Reader 11 to my deployment, and the installation went fine during installation. I followed a guide from:


http://www.itninja.com/question/hi-i-have-to-install-acrobat-reader-x1-silently-i-am-not-given-adberdr11000-en-us-exe-file-instead-i-am-given-setup-msi-ini-files-i-want-to-run-a-customization-wizard-to-create-an-mst-file-i-don-t-know-how-to-do-it-please-help


and as the forum post says, the “AdbeRdr11000_en_US.exe /sPB /rs”  also worked for me. I guess the installation of different programs is about the same, so I won’t try any other at the moment. Time will tell what I need.


Adding Drivers


One more thing you probably want to customize is different drivers. You can add/inject out-of-box drivers from different vendors. This is very useful, as you can have different setups for workstations and laptops and so on. Update: I suggest that you have a look at selection profiles (or similar) before you mess around with other driver options:


http://www.deployvista.com/Default.aspx?tabid=78&EntryID=132


Our regular workstations (Osborne Core 2’s, a bit on the older side) works fine without (almost) any additional drivers, but I’ll add the missing ones with a trick learned from a video.

Video: http://channel9.msdn.com/Events/TechDays/Tekniset-Esitystallenteet/TechNet-2011-Windows-7-k-ytt-notto-osa-2


Laptops (Lenovo)


Our Department uses Lenovo Thinkpad laptops, which uses various drivers. I will test to inject a couple of these. Lenovo have made an (excellent) administrator tools which will help you with the drivers. Instead of injecting (and downloading) a driver one by one, you can use programs that will do all of this automatically. Well, semi-automatically anyways. They’re called ThinkVantage Update Retriever and ThinInstaller. Google “thinkvantage update retriever mdt” and you will find a word document with instructions.


Here are my steps:


· Downloaded Lenovo Update Retriever 5.00 and installed it on the wds/mdt server

· Downloaded Lenovo ThinInstaller 1.2 and installed it on the wds/mdt server

· Did not completely follow the instructions in the document for setup instructions.

o   It was suggested to add drivers to Out-of-Box Drivers section. If you/I did this, drivers were added to the boot image which made it grow to a huge size. I only need LAN (and possibly HDD-drivers) for the boot image. In my case, I didn’t need either because WinPE found my HDD and LAN card without additional Out-of-Box Drivers.

· Skipped to Working with ThinInstaller-step of the guide

· Followed guide, and added a step (after restart-step in Postinstall section) in my task sequence for copying ThinInstaller files from server to c:\thin on the clients.

· Next step is to create a command after the previous step that actually runs the ThinInstaller and installs all the necessary software and drivers on the client.

The command used here is:

C:\Thin\ThinInstaller.exe /CM -search A -action INSTALL -noicon -includerebootpackages 1,3,4 –noreboot

· Run a test-Deployment on our Departments Lenovo T500

· Various results, didn’t work that great actually. Too many details to go through here.

· Ended up with plan B, which was installing Lenovo’s System Update via MDT’s “Applications”. Again, not the prettiest solution but at least you have the option of installing this software and it doesn’t take that long to install missing drivers/software afterwards.

Our main installation scenario is workstations anyway, so I’ll put my energy on other fields of the deployment process.


Workstations (Osborne)


Nothing special about this, same procedure as with laptops except different Task Sequence without the Lenovo-stuff.


· Installed our production image

· Installed missing drivers via Windows Update after deployment completed

· Copied the drivers that were installed via Windows Update (using the trick from the video described earlier)

o   From: Clients C:\Windows\system32\DriverStore\FileRepository\

o   To: mdt-server

o   Drivers with newer date than 28.11.2012 (dates after my image making/sysprepping)

· Injected the drivers into MDT

· Drivers will be used in next deployment. Tadaa 🙂

· Update: now using selection profiles instead


Now that all of the “new computer” installations are working the way I want, I decided to go ahead and try refresh and replace installations. This is handy if you get a new computer and want to save the data from your old computer for example.


Refresh installation


I decided to try a refresh installation so I would know what it does. I didn’t do this on physical hardware, just in my lab environment.


“Basically you need to launch the deployment wizard from the OS you’re about to replace.

There are a variety of ways to do this but I usually browse to my deployment point on the network and run the BDD_Autorun.wsf within the scripts folder (an example is \\<server>\distribution$\Scripts\BDD_Autorun.wsf).

It will give you the option to either Refresh or Upgrade this computer, choose refresh, finish the wizard stuff and you should be good to go.”


Source: http://social.technet.microsoft.com/forums/en-US/itprovistadeployment/thread/57629548-ad95-4da6-a85c-ec3d9fe0e33a/


I ran BDD_Autorun.wsf and sat back to watch the magic. The result was a “refreshed” computer, just the way I left it before the refresh including all my documents and all extra folders I had created.


Replace installation


I decided to try out the replace installation as well. This is more likely to come in handy when new computers arrive at the Department and we want to save all the data from the old one.

Here’s some information copy/pasted from Andrew Barnes’s scripting and deployment Blog.


An existing computer on the network is being replaced with a new computer. The user state migration data is transferred from the existing computer to share then back to the new computer. Within MDT this means running 2 task sequences, Replace Client Task Sequence then a task based on the Standard Client Task Sequence template. The Replace Task Sequence will only back up your data and wipe the disk in preparation for disposal/reuse.


  • Task Sequence deployment from within Operating System or Bare Metal
  • Task Sequence run on Source machine captures user state
  • New machine begins using PXE boot or boot image media
  • User state must be stored on a share or state migration point
  • User state and compatible applications re-applied on new machine


Source: http://scriptimus.wordpress.com/2011/06/28/mdt2010-deployment-scenarios/


clip_image022

Pic source: http://blogs.technet.com/b/chrad/archive/2012/07/26/learning-mdt-2012-s-user-driven-installation-udi.aspx


·         I created a new Standard Client Replace Task Sequence on the wds server.

·         I run BDD_Autorun.wsf (from \\wds-server\DeploymentShare$) from the computer that would be replaced, which launches the Windows Deployment Wizard.

·         I chose my newly created Standard Client Replace Task Sequence from the list of Task Sequences.

·         Didn’t work and ended up with errors. Solution was to do some modifications to CustomSettings.ini:


DeploymentType=REPLACE

UserDataLocation=AUTO

UDShare=\\10.0.0.1\MigData

UDDir=%ComputerName%


Using this modification, the User Data got stored in MigData on the wds-server.

Note: I could also have used the method described later, which is removing stuff from Customsettings.ini…

Source: http://social.technet.microsoft.com/Forums/en-US/mdt/thread/9b9d32c3-4805-4264-95a3-51e90b24bfb7


·         I now ran a Standard Client Task Sequence to do a new installation and to restore the user data from MigData.  Result: Standard Client Task Sequence did NOT restore the user data.


·         Had to some more reading about the subject, starting with: http://deployment.xtremeconsulting.com/2009/11/20/understanding-usmt-with-mdt-2010/

“The Client Deployment Wizard will ask if you want to restore user state and where the user state is stored.  The Restore User State step in the task sequence would then use USMT to restore the user state to the computer being deployed”.


This was not true in my case, the Wizard didn’t ask me anything. Time to check why.


·         Even more reading in:

http://allcomputers.us/windows_7/designing-a-lite-touch-deployment-%28part-2%29—deploying-images-to-target-computers.aspx

·         Easiest solution for me was to remove all the automatic stuff I had added in Customsettings.ini. I changed (commented out) the following so I could manually answer the questions:

;SkipBDDWelcome=YES

;SkipDeploymentType=YES

;DeploymentType=NEWCOMPUTER

:UserDataLocation=AUTO

;UDShare=\\10.0.0.1\MigData

;UDDir=%ComputerName%

;SkipUserData=Yes

·         I ran the replace task sequence from the source computer again. I now had the option to tell mdt where to save the backup and whether I wanted to restore the user data into the new installation. I saved the files to the wds-server.

·         Created a new virtual machine and deployed Windows via a Standard Client Task Sequence. Manually answered questions in the wizard. I now had the option to restore the user data.

·         Success Smile

·         (I later noticed that SkipUserData & SkipDeploymentType were the correct options to solve my little mystery. I don’t mind answering a couple of questions and I don’t have the need for UDShare and UDDir etc automatically defined).

Source: http://allcomputers.us/windows_7/designing-a-lite-touch-deployment-%28part-3%29—customizing-target-deployments.aspx )


There’s also an UPGRADE installation/deployment option, but I won’t test it because we do not have the need for it. You can’t upgrade from WinXP to Win7/8 so in our case it’s no use.


Windows 8 Deployment


I tried deploying a plain and a production image of Windows 8 also. It’s just about the same procedure as with Windows 7, but you have to uninstall WAIK and install the new Windows Assessment and Deployment Kit (Windows ADK) for Windows 8 for proper deployment.

Also, update your deployment share and copy over the new boot image to the wds server (ADK uses a new version of Windows PE).

Other than that, everything seems to be working including Task Sequences and so on.


Note:


Tried (successful) Win 8-deployment (4.3.2013) and here are a couple of other problems:


http://support.microsoft.com/kb/977512

http://msitpros.com/?p=1290


with these problems fixed everything seemed to be working just fine. (Actually uninstalled DNS completely as I didn’t need it)


Note 2:


I’ve now (5.3.2013) moved over to better driver management with selection profiles.

Good article about this:

http://www.deployvista.com/Default.aspx?tabid=78&EntryID=132


Note 3:


Learn how to deploy with UEFI in my post Converting a windows 8 BIOS Installation to UEFI 


 That’s it for this document. It’s been fun and I’ve learned a lot Smile


Sources:


Mentioned in the text.