This time I’ll show you how I (silently) deployed Matlab 2014a with custom Toolboxes. There are a lot of customizations taking place for this to be fully working, but luckily I found a good starting point at https://sccmpackager.wordpress.com/category/matlab-deployment/. Thanks a lot to the author for the guide, couldn’t have done this without it.
Steps:
- Copied the Matlab installation files to the SSCM server with directory name “Matlab R2014a”.
- Edited files for silent installation (in the root of “Matlab R2014a”). First off was “installer_input.txt”. I made the following changes:
installer_input.txt
- fileInstallationKey=xxxxx-xxxxx-xxxxx-xxxxx-xxxxx-xxxxx-xxxxx-xxxxx-xxxxx-xxxxx
- agreeToLicense=yes
- outputFile=c:\temp\matlabinstall.log (for logs on the client)
- mode=silent
- automatedModeTimeout=5000
- licensePath=license_2014.lic (We’re using a network license. A license server is already running in the domain. License_2014.lic includes information with the license server IP and the available toolboxes for this license. This file was previously downloaded directly from Mathworks).
- lmgrFiles=false
- lmgrService=false
- setFileAssoc=true
- desktopShortcut=true
- startMenuShortcut=true
- Then you have to specify which toolboxes you are going to install. Just uncomment the ones for your license. Example:
- product.MATLAB_Coder
- product.Embedded_Coder
- That’s it for the installer_input.txt. Moving over to “activate.ini”:
activate.ini
- isSilent=true
- activateCommand=activateOffline
- licenseFile=C:\Program Files\MATLAB\R2014a\license_2014a.lic
- activationKey=xxxxx-xxxxx-xxxxx-xxxxx-xxxxx-xxxxx-xxxxx-xxxxx-xxxxx-xxxxx
- installLicenseFileDir=C:\Program Files\MATLAB\R2014a\
- installLicenseFileName=license_2014a.lic
That’s it. These two were Matlabs own files. The following files are custom batch files for installation and uninstallation in SCCM. They are also located/created in the root of the Matlab source files.
install.bat
(I’ve modified/simplified the batch file from the guide above, as it was a bit too complicated and wouldn’t work).
@ECHO OFF
TASKKILL /F /IM iexplore.exe >NUL 2>&1
TASKKILL /F /IM winword.exe >NUL 2>&1
TASKKILL /F /IM outlook.exe >NUL 2>&1
TASKKILL /F /IM excel.exe >NUL 2>&1
TASKKILL /F /IM MSACCESS.exe >NUL 2>&1
TASKKILL /F /IM NOTEPAD.exe >NUL 2>&1
TASKKILL /F /IM POWERPNT.exe >NUL 2>&1
if not exist “C:\temp” md “C:\temp”
if %PROCESSOR_ARCHITECTURE%==x86 (
ECHO Installing Matlab R2014a 32-bit
ECHO Do not close this window. It will close when the install is finished.
:: Wait for 10 seconds
ping -n 20 127.0.0.1 > NUL
REM Main Install
“%~dp0setup.exe” -inputFile “%~dp0installer_input.txt” -activationPropertiesFile “%~dp0activate.ini”
) else (
ECHO Installing Matlab R2014a 64-bit
ECHO Do not close this window. It will close when the install is finished.
REM Main Install
“%~dp0setup.exe” -inputFile “%~dp0installer_input.txt” -activationPropertiesFile “%~dp0activate.ini”
)
REM Return exit code to SCCM
exit /B %EXIT_CODE%
It’s actually quite simple. The batch file runs setup.exe from the Distribution Point and uses installer_input & active.ini as input files during the setup. It also passes a “success code” to SSCM when finished. The original script however use:
if not exist “C:\Program Files\MATLAB\R2012a” md “C:\Program Files\MATLAB\R2012a”
xcopy “%~dp0license.lic” /y /e “C:\Program Files\MATLAB\R2012a\”
This step is unnecessary, as the licensing will work just fine without having to “manually” copy the .lic-file to the Matlab directory. Also, if the Matlab directory is present during the installation, the installation will FAIL. Yet again I learned the hard way after reading logs… Here’s an example from the clients c:\temp\matlabinstall.log:
(Nov 20, 2014 14:03:40) Error: Cannot install in the specified folder because there may be files remaining from a previous installation.
So yes, the Matlab directory can’t be created BEFORE the installation, period. I cleaned up the script/batch file (as above) and the installation went just fine;
(Nov 21, 2014 10:19:40) End – Successful.
uninstall.bat
@ECHO OFF
TASKKILL /F /IM iexplore.exe >NUL 2>&1
TASKKILL /F /IM winword.exe >NUL 2>&1
TASKKILL /F /IM outlook.exe >NUL 2>&1
TASKKILL /F /IM excel.exe >NUL 2>&1
TASKKILL /F /IM MSACCESS.exe >NUL 2>&1
TASKKILL /F /IM NOTEPAD.exe >NUL 2>&1
TASKKILL /F /IM POWERPNT.exe >NUL 2>&1
if %PROCESSOR_ARCHITECTURE%==x86 (
“C:\Program Files\MATLAB\R2014a\uninstall\bin\win32\uninstall.exe” -inputFile “%~dp0uninstaller_input.txt”
) else (
“C:\Program Files\MATLAB\R2014a\uninstall\bin\win64\uninstall.exe” -inputFile “%~dp0uninstaller_input.txt”
)
REM Return exit code to SCCM
exit /B %EXIT_CODE%
uninstall_input.txt
outputfile=C:\temp\matlabinstall.log
mode=silent
prefs=true
With all these files in place, the directory structure looks something like this (Fig 1):
Fig 1. Matlab directory on the SCCM server.
Deployment
Now that you have all files configured you are ready to start the actual deployment. Creating the Application in SCCM is very easy now that the underlying work is done. Just create a new Application, use script installer and fill in the desired information. For Deployment Type use script installer once again and use install.bat and uninstall.bat as arguments (Fig 2).
Fig 2. Deployment Type
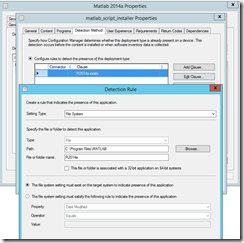
For the Detection Rule I just used the Setting Type: File System (see Fig 3).
Fig 3. Detection Rule
With these settings in place you are finally ready for deployment. (Don’t forget to distribute your content before the deployment).
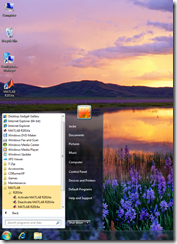
Here are some screenshots (Fig. 4 & 5) which shows that Matlab has been successfully installed (with the specified Toolboxes):
Fig 4. Matlab successfully installed 🙂
Fig 5. Matlab with specified toolboxes from installer_input.txt. (Screenshot is actually from the Matlab uninstaller). Yes, we do use a couple of Toolboxes…
There you go. Hopefully this will help someone else out there with their Matlab deployment dilemma 🙂


I have followed your steps and successfully installed MatLab via SCCM. Thanks for all your work on this. I do, however, have an issue with app detection after the installation is complete. The software always shows as failed in software center despite getting a return code of 0. Appenforce.log says that the application was not discovered. I have tried using the folder for detection per your example as well as matlab.exe exists and matlab.exe version equals blah blah blah. I was wondering if you had any pointers for getting this application to show as installed correctly. Thanks!!
Unfortunately no ideas 😦 When I installed it (a while ago) on multiple computers, I used the alternative to hide in software center..
Hi John, I found that regardless how you tell the deployment to behave (download first, or run from server) the default cache size on the SCCM client is too small. The default is 5GB and once I upped that to something bigger (20GB, but probably 10GB will do), the installer worked all the time.
Wondering too, if you have this working in SCCM, it always tells SCCM (return code) almost immediately while setup.exe is still doing it’s job installing it in the background. This is OK, but causes a lot of problems within SCCM. Two scenarios that are problematic is, can’t put it into an OS task sequence because you get failures when SCCM trudges forward and starts installing another package or worse, reboots while Matlab is still installing in the background. The other one is if you deploy it by itself, the default sleep setting on Windows 10 is a whole 30 minutes and most often interrupts it. Not to mention that if it’s in the Optional list for the end user to install, they see the “Installed” and sometimes inadvertently shut the computer down.
I’ve read a forum on Matlab’s site about this, so it’s a common problem. Any ideas? One guy put a deliberate delay in their script, but that’s kinda arbitrary.
where do you keep your .lic file for matlab? When i manually put it somewhere and point to it it works but when i try to do it from a share or from the setup directory it doesn’t want to work silently like it can’t find it.
In the same directory as the other files, in the root of the Matlab setup folder.
nice, I think i had a syntax error when i tried that before. I just threw in a xcopy to c:\license.lic for good measure though and it seems to be working fine now. Thanks for the guide!
I followed the same procedure mentioned above, getting error “There is not enough temporary space reserved to download the software. You can use the Configuration Manager control panel applet to adjust the available temporary space.”
You need to increase your SCCM cache size limit. However you can use this powershell script for testing purposes:
(New-Object -ComObject UIResource.UIResourceMgr).GetCacheInfo().Totalsize = “25000”